Viewer
A UI component that renders a multicanvas IIIF item viewer with pan-zoom support for Image via OpenSeadragon (opens in a new tab) and Video and Sound content resources using the HTML video element (opens in a new tab).
Features
Provide a IIIF Presentation API (opens in a new tab) Manifest or Collection and the component:
- Renders a multi-canvas Video, Sound, and Image viewer
- Renders thumbnails as navigation between canvases
- Renders annotations with the motivation (opens in a new tab) of
supplementingwith a content resource having the format oftext/vttfor Video and Sound - Video and Sound are rendered within a HTML5
<video>element - Image canvases are renderered with OpenSeadragon (opens in a new tab)
- Can optionally render IIIF navPlace data with the Clover Map component
- Supports HLS streaming for Video and Audio canvases
- Supports IIIF Collections and toggling between child Manifests
- Supports
placeholderCanvasfor Image canvases.
Installation
npm install @samvera/clover-iiifUsage
React
Add the Viewer component to your jsx or tsx code.
import Viewer from "@samvera/clover-iiif/viewer";Render Viewer with a IIIF Manifest or Collection URI. The only required prop is the iiifContent, which is the URI of the IIIF Manifest or Collection.
<Viewer iiifContent="https://api.dc.library.northwestern.edu/api/v2/works/8a833741-74a8-40dc-bd1d-c416a3b1bb38?as=iiif" />Vanilla JavaScript
The Viewer can also be implemented in Vanilla Javascript by use of a web component. This web component example sources a registered <clover-viewer> web component.
<html>
  <head>
    <title>Clover IIIF - Viewer - Web Component</title>
    <meta charset="UTF-8" />
  </head>
  <body>
    <script src="https://www.unpkg.com/@samvera/clover-iiif@latest/dist/web-components/index.umd.js"></script>

    <clover-viewer
      id="https://api.dc.library.northwestern.edu/api/v2/works/8a833741-74a8-40dc-bd1d-c416a3b1bb38?as=iiif"
    />
  </body>
</html>
React (prefetched Manifest)
In some use cases, applications may wish to prefetch a IIIF Manifest or Collection and pass it as a JSON object to the Viewer component. This can be done by passing the JSON object directly to the iiifContent prop.
const prefetchedManifestJson = {
  "@context": "http://iiif.io/api/presentation/3/context.json",
  id: "https://iiif.io/api/cookbook/recipe/0001-mvm-image/manifest.json",
  type: "Manifest",
  label: {
    en: ["Single Image Example"],
  },
  items: [
    {
      id: "https://iiif.io/api/cookbook/recipe/0001-mvm-image/canvas/p1",
      type: "Canvas",
      height: 1800,
      width: 1200,
      items: [
        {
          id: "https://iiif.io/api/cookbook/recipe/0001-mvm-image/page/p1/1",
          type: "AnnotationPage",
          items: [
            {
              id: "https://iiif.io/api/cookbook/recipe/0001-mvm-image/annotation/p0001-image",
              type: "Annotation",
              motivation: "painting",
              body: {
                id: "http://iiif.io/api/presentation/2.1/example/fixtures/resources/page1-full.png",
                type: "Image",
                format: "image/png",
                height: 1800,
                width: 1200,
              },
              target:
                "https://iiif.io/api/cookbook/recipe/0001-mvm-image/canvas/p1",
            },
          ],
        },
      ],
    },
  ],
};<Viewer iiifContent={prefetchedManifestJson} />Next.js
Implementation with Next.js requires a dynamic import (opens in a new tab) utilizing next/dynamic. This is due to Next's node compilation method creating issue with an OpenSeadragon (a dependency of Clover IIIF) assumption of a browser document object.
import dynamic from "next/dynamic";

const Viewer = dynamic(
  () => import("@samvera/clover-iiif").then((Clover) => Clover.Viewer),
  {
    ssr: false,
  },
);

const MyCustomViewer = () => {
  const iiifContent =
    "https://api.dc.library.northwestern.edu/api/v2/collections/c373ecd2-2c45-45f2-9f9e-52dc244870bd?as=iiif";

  return <Viewer iiifContent={iiifContent} />;
};
API Reference
Viewer can configured through an options prop, which will serve as a object for common options.
| Prop | Type | Required | Default |
|---|---|---|---|
iiifContent | string as URI, or JSON object as Manifest or Collection | Yes | |
iiifContentSearchQuery | See Content Search | No | |
canvasIdCallback | function | No | |
contentStateCallback | See IIIF Content State | No | |
customDisplays | See Custom Displays | No | |
customTheme | object | No | |
plugins | See Plugins | No | |
options | object | No | |
options.background | string CSS (opens in a new tab) | No | transparent |
options.canvasBackgroundColor | string CSS (opens in a new tab) | No | #1a1d1e |
options.canvasHeight | string CSS (opens in a new tab) | No | 500px |
options.crossOrigin | anonymous, use-credentials, or undefined crossorigin (opens in a new tab) | No | anonymous |
options.ignoreCaptionLabels | string[] | No | [] |
options.openSeadragon | OpenSeadragon.Options | No | |
options.map | See Map Display | No | |
options.informationPanel | See Information Panel | No | |
options.annotations | { motivations?: string[] } | No | All motivations |
options.requestHeaders | IncomingHttpHeaders | No | { "Content-Type": "application/json" } |
options.showDownload | boolean | No | true |
options.showIIIFBadge | boolean | No | true |
options.showMediaSearch | boolean | No | true |
options.showResourceIcons | boolean | No | false |
options.showTitle | boolean | No | true |
options.customLoadingComponent | React.ComponentType | No | |
options.controlButtons | See Control Buttons | No | |
options.withCredentials | boolean | No | false |
options.contentSearch | See Content Search | No |
- Options
canvasBackgroundColorandcanvasHeightwill apply to both<video>elements and the OpenseaDragon canvas. - Option
withCredentialsbeing set astruewill inform IIIF resource requests to be made using credentials (opens in a new tab) such as cookies, authorization headers or TLS client certificates. - Option
options.openSeadragonwill grant you ability to override the OpenSeadragon default options (opens in a new tab) set within the Clover IIIF Viewer to adjust touch and mouse gesture settings and various other configurations. - When the visitor's OS is set to
prefers-reduced-motion: reduce, Clover sets OpenSeadragon'sanimationTimeto0so zoom and pan happen instantly instead of easing. Pass your ownanimationTimeinoptions.openSeadragonto override this.
Map Display
The Viewer can use the Clover Map component as its primary canvas display when navPlace data is available. This is opt-in through options.map.enabled.
With navPlaceLevel: "auto", Clover displays the most specific available map data for the current view: Annotation, Canvas, Manifest, then Collection. Use a fixed level to force a Collection, Manifest, Canvas, Annotation, or all available navPlace features.
This example adds Manifest-level navPlace to Northwestern's Crossing the Pend d'Oreille - Kalispel Manifest. The point geometry uses the Pend Oreille River GeoNames record (opens in a new tab) coordinates, and the map popup is enriched from the Manifest label, summary, and thumbnail.
const northwesternManifest = await fetch(
  "https://api.dc.library.northwestern.edu/api/v2/works/8a833741-74a8-40dc-bd1d-c416a3b1bb38?as=iiif",
).then((response) => response.json());

const manifest = {
  ...northwesternManifest,
  summary: {
    none: [
      "Photogravure from Edward S. Curtis's The North American Indian, Volume 7, mapped to the Pend Oreille River GeoNames record.",
    ],
  },
  navPlace: {
    type: "FeatureCollection",
    features: [
      {
        type: "Feature",
        id: "https://www.geonames.org/7315798/pend-oreille-river.html",
        properties: {
          label: { none: ["Pend Oreille River"] },
        },
        geometry: {
          type: "Point",
          coordinates: [-117.61775, 49.00381],
        },
      },
    ],
  },
};

<div style={{ position: "relative", height: "580px" }}>
  <Viewer
    iiifContent={manifest}
    options={{
      canvasHeight: "500px",
      showIIIFBadge: false,
      informationPanel: {
        open: false,
        renderToggle: false,
      },
      map: {
        enabled: true,
        navPlaceLevel: "Manifest",
        fitToData: true,
      },
    }}
  />
</div>;<Viewer
iiifContent="https://iiif.io/api/cookbook/recipe/0240-navPlace-on-canvases/manifest.json"
options={{
map: {
enabled: true,
navPlaceLevel: "auto",
fitToData: true,
},
}}
/>| Prop | Type | Required | Default |
|---|---|---|---|
options.map.enabled | boolean | No | false |
options.map.fitToData | boolean | No | true |
options.map.navPlaceLevel | auto | Collection | Manifest | Canvas | Annotation | all | No | auto |
options.map.showImageOverlay | boolean | No | false |
options.map.imageOverlayOpacity | number (0–1) | No | 0.65 |
options.map.showControlPoints | boolean | No | true |
options.map.overlayScope | manifest | canvas | No | manifest |
When showImageOverlay is enabled, Clover auto-discovers Georeference Extension (opens in a new tab) annotations (motivation: "georeferencing") on the in-scope canvases and warps the source images onto the map via @allmaps/maplibre (opens in a new tab). Canvas-sourced annotations are adapted to each canvas's painting image service automatically. overlayScope: "manifest" (default) renders every georeferenced sheet in the manifest at once; "canvas" follows the active canvas. See Image Overlays for a worked example combining multiple sheets with navPlace geometry.
Annotation Motivations
Limit which textual annotations render inside the Information Panel by specifying the motivations to display. When set, Clover filters each manifest annotation page and only renders annotations whose motivation (opens in a new tab) matches the provided list. Leave undefined (the default) to render every motivation.
<Viewer
  iiifContent="https://example.org/iiif/manifest"
  options={{
    annotations: {
      motivations: ["commenting", "transcribing"],
    },
  }}
/>
Canvas Height
The height of the canvas can be set using the options.canvasHeight prop. This prop accepts a string value that is a valid CSS height value. The default value is 500px.
Automatic Height
If the height is set to auto or 100%, the Viewer will expand to the height of its wrapping container element. The wrapping element must have a position relative, along with a defined height for this to display as expected. Be aware to set a z-index value of 0 or an applicable value within your consuming application to ensure the viewer does not conflict with other page elements.
export default function App() {
  const iiifContent =
    "https://api.dc.library.northwestern.edu/api/v2/works/8a833741-74a8-40dc-bd1d-c416a3b1bb38?as=iiif";

  const options = {
    canvasHeight: "auto", // or "100%"
  };

  return (
    <div style={{ position: "relative", height: "80vh", zIndex: "0" }}>
      <Viewer iiifContent={iiifContent} options={options} />
    </div>
  );
}
Media Search
Manifests with more than one canvas render a media strip below the viewer, with a
search toggle that filters the strip by canvas label. Set
options.showMediaSearch to false to hide the toggle; the strip and its
previous/next navigation are unaffected.
const options = {
  showMediaSearch: false,
};
Resource Icons
Each thumbnail in the media strip can carry a small badge in its top-right corner naming the
resource type of that canvas — image, video or sound. Set options.showResourceIcons to
true to show it.
It is off by default. On a Manifest of scanned pages every canvas is an image, so the badge repeats one glyph the whole way down the strip without telling the reader anything they cannot already see. Turn it on for a mixed Manifest, where knowing which canvases are time-based is worth the space it takes.
  <Viewer
    iiifContent="https://iiif.io/api/cookbook/recipe/0024-book-4-toc/manifest.json"
    options={{ showResourceIcons: true }}
  />;
Every canvas in that example is an image, which is the case the default is chosen for: the badge is the same on all six thumbnails.
The runtime on a video or sound canvas is not governed by this option. It is the only place
the strip states how long a time-based canvas runs, so it shows either way — with
showResourceIcons off, such a canvas carries a badge holding just its duration.
Information Panel
The information panel is a collapsible panel that displays information about the current Manifest and renders annotations, a Contents table built from the Manifest's structures, and IIIF Content Search for the active canvas. It is rendered by default, but can be configured to hide About or opt out of individual data-backed tabs.
| Prop | Type | Required | Default |
|---|---|---|---|
options.informationPanel.open | boolean | No | true |
options.informationPanel.vtt.autoScroll | See Auto Scroll | No | true |
options.informationPanel.renderAbout | boolean | No | true |
options.informationPanel.renderAnnotation | boolean | No | true |
options.informationPanel.renderContents | boolean | No | true |
options.informationPanel.renderToggle | boolean | No | true |
options.informationPanel.toggleComponent | React.ComponentType | No | |
options.informationPanel.renderContentSearch | boolean | No | true |
options.informationPanel.renderCanvasSummary | boolean | No | false |
options.informationPanel.defaultTab | string | No | automatic |
options.informationPanel.annotationTabLabel | string | No |
Every render* option is on by default: a tab is only withheld when its option is explicitly set to false. Panel visibility is then based on the content Clover can actually render:
- About is available whenever
renderAboutis notfalse. - Annotations (including VTT chapters and transcripts) are available when the active canvas has them and
renderAnnotationis notfalse. - Contents is available when the Manifest has
structuresandrenderContentsis notfalse. - IIIF Content Search is available when the Manifest has a Content Search service and
renderContentSearchis notfalse.
When Clover renders its toggle (the default), the toggle owns the panel: open supplies the initial state, the reader opens and closes it, and the panel appears only when it is open and has something to show.
When renderToggle is false there is no way for the reader to open the panel, so available Annotations, Contents, or Content Search make the panel visible even if open or renderAbout is false. About alone still respects open. To suppress the panel for such a Manifest, set the corresponding renderAnnotation, renderContents, or renderContentSearch option to false.
The legacy renderSupplementing, renderAnnotationCollection, and annotationCollectionTabLabel fields remain in the public configuration type for compatibility, but they do not independently control current tab rendering. Use renderAnnotation and annotationTabLabel for the shared Annotations tab.
Set renderCanvasSummary to true to show the active canvas's summary above
the manifest's own, for manifests that describe each image rather than only the
object. It follows the active canvas and renders nothing when that canvas has no
summary. Off by default, since it adds text to the About tab.
Use options.informationPanel.defaultTab to choose a preferred tab. Clover applies that preference once the tab's backing data becomes available. While an asynchronous tab is loading—or when the configured tab is unavailable—Clover selects the first available tab so the panel never opens with blank content. The built-in fallback order is Annotations, Content Search, About, Contents, then Map, followed by plugin tabs.
Manifests with IIIF structures render a Contents tab by default. The tab uses
Range labels as a table of contents, and selecting a range opens the first canvas
inside that range. Set renderContents to false to hide it:
<Viewer
  iiifContent="https://iiif.io/api/cookbook/recipe/0024-book-4-toc/manifest.json"
  options={{
    informationPanel: {
      renderContents: false,
    },
  }}
/>
To open the information panel on the Contents tab, use manifest-contents.
<Viewer
  iiifContent="https://iiif.io/api/cookbook/recipe/0024-book-4-toc/manifest.json"
  options={{
    informationPanel: {
      defaultTab: "manifest-contents",
    },
  }}
/>
If you want content search to be the default tab, use manifest-content-search
<Viewer
  iiifContent="https://example.com/manifest/1"
  options={{
    informationPanel: {
      defaultTab: "manifest-content-search",
    },
  }}
/>
To make the shared Annotations tab the default when the active canvas has annotations, use manifest-annotations.
<Viewer
  iiifContent="https://example.com/manifest/1"
  options={{
    informationPanel: {
      defaultTab: "manifest-annotations",
    },
  }}
/>
Auto Scroll
When VTT annotations are displayed, the Clover IIIF Viewer can automatically scroll the information panel to keep the currently active caption in view. Whether it does so (and how) is governed by the informationPanel.vtt.autoScroll configuration option. The possible values are:
{ behavior: (behavior), block: (block) }: auto-scroll using the given settings (see below).true: Auto-scroll using the default behavior. This is equivalent to{ behavior: "smooth", block: "center" }.false: Do not auto-scroll.
The settings take the form { behavior: "auto" | "instant" | "smooth", block: "center" | "end" | "nearest" | "start" }, and have the same effect as the scrollIntoViewOptions object documented with the Element.scrollIntoView() (opens in a new tab) Web API method. (The inline option does not apply since there is no horizontal scrolling involved.)
Custom Displays
Clients may wish to use their own display components (for example a PDF Viewer, or an audio player, etc). To configure custom displays, use the customDisplays prop, which is an array of objects defining display and target properties. See an example implementation
display.component is a custom React component, and display.componentProps are pass-through props which Viewer will attach to your Custom Display component. The target object provides two methods of matching a Canvas to a Custom Display: target.canvasId which is a manifest's canvas id. Or by target.paintingFormat (ie. application/pdf) which is the body.type in a canvas's Annotation of type "painting".
| Prop | Type | Required | Default |
|---|---|---|---|
customDisplays.display.component | React.Node | No | |
customDisplays.display.componentProps | object | No | |
customDisplays.target.canvasId | string[] | No | |
customDisplays.target.paintingFormat | string[] | No |
IIIF Content State
Clover supports IIIF Content State in multiple ways. This specifications allows you to render a provided state to the Viewer component, including the active canvas, a xywh or t selector, and body which might be textual content. The Clover Viewer can both provide the current state of a component and render a given state.
Content State Callback
You can use the contentStateCallback prop to receive the current content state as a base64 encoded JSON string and as raw JSON. Using this, you can provide a consuming application the view of the user. This could helpful for sharing or storing the state for later use by a user. To review this further, see Content State.
  const handleContentStateCallback = ({ encoded, json }) => {
    console.log({
      encoded, // base64 encoded JSON
      json, // raw JSON
    });
  };

  <Viewer
    iiifContent="https://iiif.harvardartmuseums.org/manifests/object/299837"
    contentStateCallback={handleContentStateCallback}
  />;
IIIF Content Search
To display IIIF Content Search in the information panel, add a supported Content Search service to the Manifest and leave options.informationPanel.renderContentSearch enabled.
{
  "@context": ["http://iiif.io/api/presentation/3/context.json"],
  "type": "Manifest",
  ...
  "service": [
    {
      "id": "https://example.com/search",
      "type": "SearchService2"
    }
  ]
}| Prop | Type | Required | Default |
|---|---|---|---|
iiifContentSearchQuery.q | string | No | |
options.contentSearch.searchResultsLimit | number | No | 20 |
options.contentSearch.overlays.backgroundColor | string | No | #ff6666 |
options.contentSearch.overlays.borderColor | string | No | #990000 |
options.contentSearch.overlays.borderType | string | No | solid |
options.contentSearch.overlays.borderWidth | string | No | 1px |
options.contentSearch.overlays.opacity | number | No | 0.5 |
options.contentSearch.overlays.renderOverlays | boolean | No | true |
options.contentSearch.overlays.zoomLevel | number | No | 4 |
Many sites have search functionality that returns a list of objects matching the search terms. Clicking a search result displays the details page for one object. To highlight search terms when the Clover image viewer loads on that details page, use iiifContentSearchQuery when setting up the viewer.
<Viewer
  iiifContent="https://example.com/manifest/1"
  iiifContentSearchQuery={{
    q: "my search terms",
  }}
/>
options.contentSearch.searchResultsLimit is the maximum number of search results to display per canvas in the information panel. If set to undefined, Clover will show all search results.
By default, Clover's content search will draw light red boxes in the image viewer for each search result returned by the search service. You can set the appearance of the highlighted boxes using options.contentSearch.overlays. If you don't want the search results to be highlighted, set options.contentSearch.overlays.renderOverlays to false.
When you click on the list of search results, Clover will pan and zoom to the location of that search result. You can set the zoom level using options.contentSearch.overlays.zoomLevel. A small zoom level will zoom in real close; a large zoom level will zoom in less.
Deprecated Options
| Prop | In Favor Of | Deprecated |
|---|---|---|
id | iiifContent | v2.0.0 |
manifestId | iiifContent | v2.0.0 |
options.renderAbout | options.informationPanel.renderAbout | v2.0.3 |
options.showInformationToggle | options.informationPanel.renderToggle | v2.0.3 |
Basic Configuration
Example customization of various options.
const options = {
  // Primary title (Manifest label) for top level canvas.  Defaults to true
  showTitle: false,

  // IIIF Badge and popover containing options.  Defaults to true
  showIIIFBadge: false,

  // Ignore supplementing canvases by label value that are not for captioning
  ignoreCaptionLabels: ['Chapters'],

  // Override canvas background color, defaults to #1a1d1e
  canvasBackgroundColor: "#000",
}

<Viewer
  iiifContent="https://api.dc.library.northwestern.edu/api/v2/works/8a833741-74a8-40dc-bd1d-c416a3b1bb38?as=iiif"
  options={options}
/>
Scroll to Zoom
By default, Clover disables scrolling to zoom in the OpenSeadragon canvas. You can enable this by setting the scrollToZoom option to true in the options.openSeadragon.gestureSettingsMouse configuration. This allows users to zoom in and out of the canvas using their mouse scroll wheel or trackpad gestures.
const options = {
  // Set canvas zooming onScoll (this defaults to false)
  openSeadragon: {
    gestureSettingsMouse: {
      scrollToZoom: true;
    }
  }
}

<Viewer
  iiifContent="https://api.artic.edu/api/v1/artworks/16568/manifest.json"
  options={options}
/>
Rendering Drawer
OpenSeadragon draws tiles with WebGL where the device supports it, falling back to a 2D
canvas otherwise. That is OpenSeadragon's own auto default and Clover does not override
it.
Each viewer holds its own WebGL context, and browsers cap how many contexts may exist at
once. A page that mounts many viewers will log Too many active WebGL contexts and
OpenSeadragon will drop the oldest, recovering on the canvas drawer. If you are placing
several viewers on one page and would rather have predictable rendering than the faster
path, pin the drawer:
const options = {
  openSeadragon: {
    drawer: "canvas",
  },
};

<Viewer
  iiifContent="https://api.artic.edu/api/v1/artworks/16568/manifest.json"
  options={options}
/>;Testing with jsdom? OpenSeadragon reads window.matchMedia while resolving
the drawer and does not guard for its absence, so stub it in your test setup
or any test that mounts the Viewer will throw.
Active Canvas
Example on using canvasIdCallback to return to your consuming application the active canvas ID. This will return as a string.
const iiifContent =
  "https://api.dc.library.northwestern.edu/api/v2/works/8a833741-74a8-40dc-bd1d-c416a3b1bb38?as=iiif";

const handlCanvasIdCallback = (activeCanvasId) => {
  if (activeCanvasId) console.log(activeCanvasId);
};

return (
  <Viewer iiifContent={iiifContent} canvasIdCallback={handlCanvasIdCallback} />
);
Captions
WebVTT content resources are the source for both content mapped closed captioning <track/> elements in the HTML 5 video player and to the navigator panel adjacent to it. You may ignore these resources as tracks if they are not intended for closed captioning or subtitling by string values matching the label of the content resource. This is a manual option within the viewer as there is no defined way for a manifest to prescribe motivation for these resources beyond supplementing.
export default function App() {
  const iiifContent =
    "https://raw.githubusercontent.com/samvera-labs/clover-iiif/main/public/fixtures/iiif/manifests/captions.json";

  const options = {
    ignoreCaptionLabels: ["Chapters"],
  };

  return <Viewer iiifContent={iiifContent} options={options} />;
}
Theming
Clover reads its colors and fonts from CSS custom properties. Set any of them on an
ancestor element — or in a stylesheet — and every component picks the value up through
the cascade. No prop, no wrapper component, and it applies to a nested Image or Map
just as it does to the Viewer.
/* Anywhere above the component: :root, a layout wrapper, a single section. */
.my-app {
  --clover-color-accent: #c62828;
  --clover-color-primary: #37474f;
}
Because these are ordinary custom properties, they can be scoped to part of a page, changed at runtime, or wired to whatever design tokens your application already has:
<div style={{ "--clover-color-accent": "#C62828" }}>
  <Viewer iiifContent={iiifContent} />
</div>
Every token, with the value Clover falls back to when it is not set:
| Custom property | Default | Role |
|---|---|---|
--clover-color-primary | #1A1D1E | Black and dark grays in a light theme |
--clover-color-primary-muted | #26292B | |
--clover-color-primary-alt | #151718 | |
--clover-color-accent | #0065C3 | Key brand color |
--clover-color-accent-muted | #50A0EC | |
--clover-color-accent-alt | #0F4F8A | |
--clover-color-secondary | #fff | White and light grays in a light theme |
--clover-color-secondary-muted | #E6E8EB | |
--clover-color-secondary-alt | #C1C8CD |
For contrast, primary and accent should each reach 4.5:1 or greater against
secondary, and secondary should reach 4.5:1 against both primary and accent.
There is no font property, and nothing to set. Clover's components declare
font-family: inherit and take their type from whatever contains them, so a component
dropped into a page that already uses a typeface is using it too. To give a component a
family different from the rest of the page, set font-family on an element around it:
<div style={{ fontFamily: "'Helvetica Neue', sans-serif" }}>
  <Viewer iiifContent={iiifContent} />
</div>
The Map component is the one exception to the cascade. Its markers are painted by
WebGL rather than CSS, so the accent is resolved to a concrete value when the map
initializes; a token changed after that point will not repaint existing layers until the
component remounts.
Corner radius and motion
Two shapes and one curve account for nearly every rounded corner and transition in Clover, so each is a single property. Radius is the fastest way to make Clover look like the rest of an application; motion is the one to reach for to slow the interface down, or to stop it moving.
| Custom property | Default | Applies to |
|---|---|---|
--clover-radius | 3px | The small corner: thumbnails, tags, annotation rows, popovers |
--clover-radius-pill | 2rem | Fully rounded controls: the carousel arrows, search fields, the position counter, View All |
--clover-transition | all 200ms cubic-bezier(.16,1,.3,1) | Hover, focus and layout transitions throughout |
--clover-transition-load | opacity 150ms ease-out | The shorter curve a thumbnail fades in on once its image has actually arrived |
body {
  /* square everything off */
  --clover-radius: 0;
  --clover-radius-pill: 4px;
}
Motion takes a whole shorthand, not a duration, so it can be turned off outright:
@media (prefers-reduced-motion: reduce) {
  body {
    --clover-transition: none;
    --clover-transition-load: none;
  }
}
A few corners are deliberately not tokenized: the animation filmstrip's 2px frames, and the
three controls that round with 50% rather than a length. 50% and a length only agree while
those controls are square, and tying them together would make them disagree the moment a
consumer resized one.
Thumbnail size
Thumbnails are square by default, sized from their width. Set a height only if you want to break that ratio.
| Property | Default | Applies to |
|---|---|---|
--clover-thumbnail-width | 161.8px | Canvas rail tile width, About panel bounding box, and the Slider card (which falls back to 15rem) |
--clover-thumbnail-height | unset — height follows the width, giving 1:1 | Overrides the ratio wherever a thumbnail has a box |
.my-app {
  /* wider tiles, still square */
  --clover-thumbnail-width: 200px;
}

.my-app-letterboxed {
  /* break the ratio: 200 x 100 tiles */
  --clover-thumbnail-width: 200px;
  --clover-thumbnail-height: 100px;
}
Each surface applies the pair in the way that suits it, which is worth knowing before you set a value and find one of them unchanged:
- Canvas rail — a box with
object-fit: cover, so a non-square ratio crops rather than distorts. - Animation frame strip — height-driven, width follows each frame's own aspect. A filmstrip reads better un-cropped, so it takes the height and ignores the square default.
- About panel — a
max-width/max-heightbounding box withobject-fit: contain, so the whole image stays visible inside it. - Slider card — 1:1 from its width, honouring a set height like the rail does. It reads the same two properties; only its fallback differs, at
15remrather than161.8px.
The canvas rail used to be a fixed 161.8 × 100. It is now 161.8 square,
so the rail is taller than in earlier versions. Add
--clover-thumbnail-height: 100px to restore the previous proportions
exactly.
The OpenSeadragon navigator is deliberately not covered by these. It is a minimap of the image rather than a thumbnail, and forcing it square would misrepresent the viewport it draws.
Custom Theme prop
customTheme is deprecated in favor of the CSS custom properties above, and
is planned for removal in the next major version. It remains fully supported
until then — no change is required today.
You may also override the base theme by passing optional colors and fonts as a prop. Naming conventions for colors are limited to those shown in the config example below. Any subset may be given; tokens you leave out keep their defaults.
const iiifContent =
  "https://api.dc.library.northwestern.edu/api/v2/works/8a833741-74a8-40dc-bd1d-c416a3b1bb38?as=iiif";

const customTheme = {
  colors: {
    /**
     * Black and dark grays in a light theme.
     * All must contrast to 4.5 or greater with `secondary`.
     */
    primary: "#37474F",
    primaryMuted: "#546E7A",
    primaryAlt: "#263238",

    /**
     * Key brand color(s).
     * `accent` must contrast to 4.5 or greater with `secondary`.
     */
    accent: "#C62828",
    accentMuted: "#E57373",
    accentAlt: "#B71C1C",

    /**
     * White and light grays in a light theme.
     * All must must contrast to 4.5 or greater with `primary` and  `accent`.
     */
    secondary: "#FFFFFF",
    secondaryMuted: "#ECEFF1",
    secondaryAlt: "#CFD8DC",
  },
  fonts: {
    sans: "'Helvetica Neue', sans-serif",
    display: "Optima, Georgia, Arial, sans-serif",
  },
};

return <Viewer iiifContent={iiifContent} customTheme={customTheme} />;
customTheme is applied as --clover-* custom properties on the Viewer's root element,
so the two approaches are the same mechanism underneath. Setting a token on an ancestor
and passing customTheme therefore combine as you would expect: the prop wins inside
the Viewer, because it is declared closer to the component.
CSS Classes
Additional CSS classes are made available on structural HTML elements in the Viewer, which may be referenced in a client's own CSS files/style definitions to further customize the Viewer's appearance. You may inspect the DOM to see classes applied to each element, but in general it follows a pattern similar to:
<div class="clover-viewer">
  <header class="clover-viewer-header" />
  <div class="clover-viewer-content">
    <div class="clover-viewer-painting">...</div>
  </div>
</div>
Other components in the suite expose a root class for the same purpose: clover-map on
Map, clover-slider on Slider, and clover-iiif-image-openseadragon on Image.
Descendants follow the same prefixed pattern.
Styling WebVTT Captions
-
Each WebVTT Cue is rendered inside a
<div class="webvtt-cue"/>element. -
The following inline formatting tags are passed through without alteration:
- Bold (
<b/>) - Italic (
<i/>) - Underline (
<u/>) - Ruby (opens in a new tab) (
<ruby/>) and Ruby Text (opens in a new tab) (<rt/>)
- Bold (
-
Several WebVTT-specific tags are processed in special ways:
- Voice Tags (e.g.,
<v speaker>Caption</v>) are wrapped in<span title="speaker"/>and can be styled using the CSS selector.webvtt-cue span[title="speaker"] - Class Tags (e.g.,
<c.classToAdd>Caption</c>) are wrapped in<span class="classtoAdd"/>and can be styled using the CSS selector.webvtt-cue span.classToAdd - Language Tags (e.g.,
<lang.en-US>English Caption</lang>) are handled the same as Class Tags - wrapped in<span class="en-US"/>and can be styled using the CSS selector.webvtt-cue span.en-US
- Voice Tags (e.g.,
-
WebVTT CSS extensions (
STYLEblocks and::cuepseudo-elements) are not supported
Request Headers
In some cases, a client may need to request Manifest or Collection resources with custom request headers, ex: Authorization. This can be done by passing a requestHeaders object to the options prop. This object will be passed to the request call made by the Viewer. Accepted header keys are defined in the IncomingHttpHeaders (opens in a new tab) interface.
const iiifContent =
  "https://api.dc.library.northwestern.edu/api/v2/works/8a833741-74a8-40dc-bd1d-c416a3b1bb38?as=iiif";

const token = "eyJhbGciOiJIUzI1NiIsInR5cCI6IkpXVCJ9...";

return (
  <Viewer
    iiifContent={iiifContent}
    options={{
      requestHeaders: {
        "Content-Type": "application/json",
        Authorization: `Bearer ${token}`,
      },
    }}
  />
);
Custom Loading Component
Clients may choose to override the default loading component that displays while the IIIF resource is fetched and loaded into state.
<Viewer
  iiifContent="https://example.com/manifest/1"
  options={{
    customLoadingComponent: () => <>My custom loading component</>,
  }}
/>
Control Buttons
Clients may replace the buttons in the image viewer's control bar with their own components. Each key is optional, so overriding one control leaves the others as Clover's.
OpenSeadragon binds its handlers by element id, so a replacement must put the id it is given on the element it wants clicks from. It should also use label as the accessible name, since Clover's own svg title is not rendered. Everything else — shape, size, markup, styling — belongs to the client.
// Spread buttonProps and the control works; the element and its styling are yours.
const ZoomIn = ({ buttonProps }) => (
  <button {...buttonProps} className="my-square-button">
    <MyZoomInIcon />
  </button>
);

<Viewer
  iiifContent="https://example.com/manifest/1"
  options={{
    controlButtons: { zoomIn: ZoomIn },
  }}
/>;
Each replacement receives buttonProps (the id OpenSeadragon binds to, type, and the accessible name), icon (Clover's own glyph, if you want to keep it), and label as plain text. Render whatever element you like, in any shape, as long as buttonProps is spread onto the interactive element.
| Key | Control |
|---|---|
zoomIn | Zoom in |
zoomOut | Zoom out |
fullPage | Full screen |
rotateRight | Rotate right |
rotateLeft | Rotate left |
reset | Reset zoom and rotation |
Each control is still gated on its OpenSeadragon flag (showZoomControl, showFullPageControl, showRotationControl, showHomeControl), so a replacement for a hidden control is not rendered. Note that options.openSeadragon.navImages has no effect: Clover supplies OpenSeadragon with button elements, and OpenSeadragon skips its own control images when it is given one.
Two things to know when writing a replacement:
- Spread
buttonProps. It carries the id OpenSeadragon binds its handlers to and the accessible name. A component that drops it renders a button that looks right and does nothing; Clover logs a warning outside production when that happens. - Define the component at module scope. A component declared inline in
optionsis a new type on each render, which remounts the button and leaves OpenSeadragon bound to the discarded element.
OpenSeadragon sets display: inline-block and position: relative on the element as inline styles, which no class can override, so centre the glyph with margin: auto or on a wrapper inside the button rather than making the button a flex container. Clover's own spacing (margin-left: 0.618rem between controls) does not apply to a replacement, so add it if you are replacing only some of them.
The information panel toggle sits outside this control bar and is replaced through options.informationPanel.toggleComponent. It is driven by Clover's state rather than OpenSeadragon, so its buttonProps carry the click handler and aria-expanded instead of an id, and none of the caveats above apply to it. isOpen is passed separately so the glyph can follow the panel state. Replacing the controls without it tends to look unfinished, since the default toggle keeps Clover's own shape.
Clover positions the replacement where its own toggle sits, so it only needs to supply the button itself.
const PanelToggle = ({ buttonProps, isOpen }) => (
  <button {...buttonProps} className="my-square-button">
    {isOpen ? <MyCloseIcon /> : <MyPanelIcon />}
  </button>
);

<Viewer
  iiifContent="https://example.com/manifest/1"
  options={{
    informationPanel: { toggleComponent: PanelToggle },
  }}
/>;
Custom canvas displays
Clients may wish to use their own display components instead of Clover Viewer's default displays (OpenSeadragon (opens in a new tab) for images and HTML Video Player (opens in a new tab) for audio/video). The Viewer component allows a client to target individual canvas items in a IIIF Manifest by either direct reference to a canvas id or format (ie. video/ogg). See the Type Definition below for CustomDisplay, and an example implementation.
import AnotherCustomDisplay from "./AnotherCustomDisplay";

type CustomDisplay = {
  display: {
    component: React.ElementType;
    componentProps: {
      // Any custom props you want to pass to your component
      [key: string]: any;
    };
  };
  target: {
    canvasId: string[];
    paintingFormat: string[]; // "application/pdf" or "application/epub+zip"
  };
};

function MyCustomDisplay({ id, annotationBody, ...restProps }: CustomDisplay) {
  return (
    <div>
      <h1>My Custom Display</h1>
      <p>Canvas ID: {id}</p>
      <p>Annotation Body:</p>
      <pre>{JSON.stringify(annotationBody)}</pre>
      <p>Custom props:</p>
      <pre>{JSON.stringify(restProps)}</pre>
      ...your display here
    </div>
  );
}

<Viewer
  iiifContent={iiifContent}
  customDisplays={[
    {
      display: {
        component: MyCustomDisplay,
        componentProps: {
          foo: "bar",
        },
      },
      target: {
        canvasId: [
          "https://uri-for-a-canvas-id/access/0",
          "https://uri-for-a-canvas-id/access/1",
        ],
      },
    },
    {
      display: {
        component: AnotherCustomDisplay,
      },
      target: {
        paintingFormat: ["application/pdf", "image/gif"],
      },
    },
  ]}
/>;
The Viewer component will pass the following props to your custom display component:
id: The canvasidfor the resource being rendered. This may be helpful if you wanted to use the canvasidto fetch additional data from your application's API.annotationBody: Thebodyvalue for a canvasAnnotationitem withmotivation"painting".
{
  "id": "https://uri-for-a-canvas-id/access/0",
  "type": "Annotation",
  "motivation": "painting",
  "body": {
    "format": "application/pdf",
    "height": 1686,
    "id": "http://localhost:3000/media/pdf/file-sample_150kB.pdf",
    "width": 1192
  }
}
See a complete recipe for a PDF Viewer (opens in a new tab) using custom canvas displays.
Plugins
Clover supports 3rd-party plugins as a way to add more functionality to Clover. To add plugins, use the plugins prop. plugins will accept an array of objects, with each object representing a plugin.
People can use prebuilt plugins or create their own plugins. To install a prebuilt plugin, people should follow the instructions for the particular plugin.
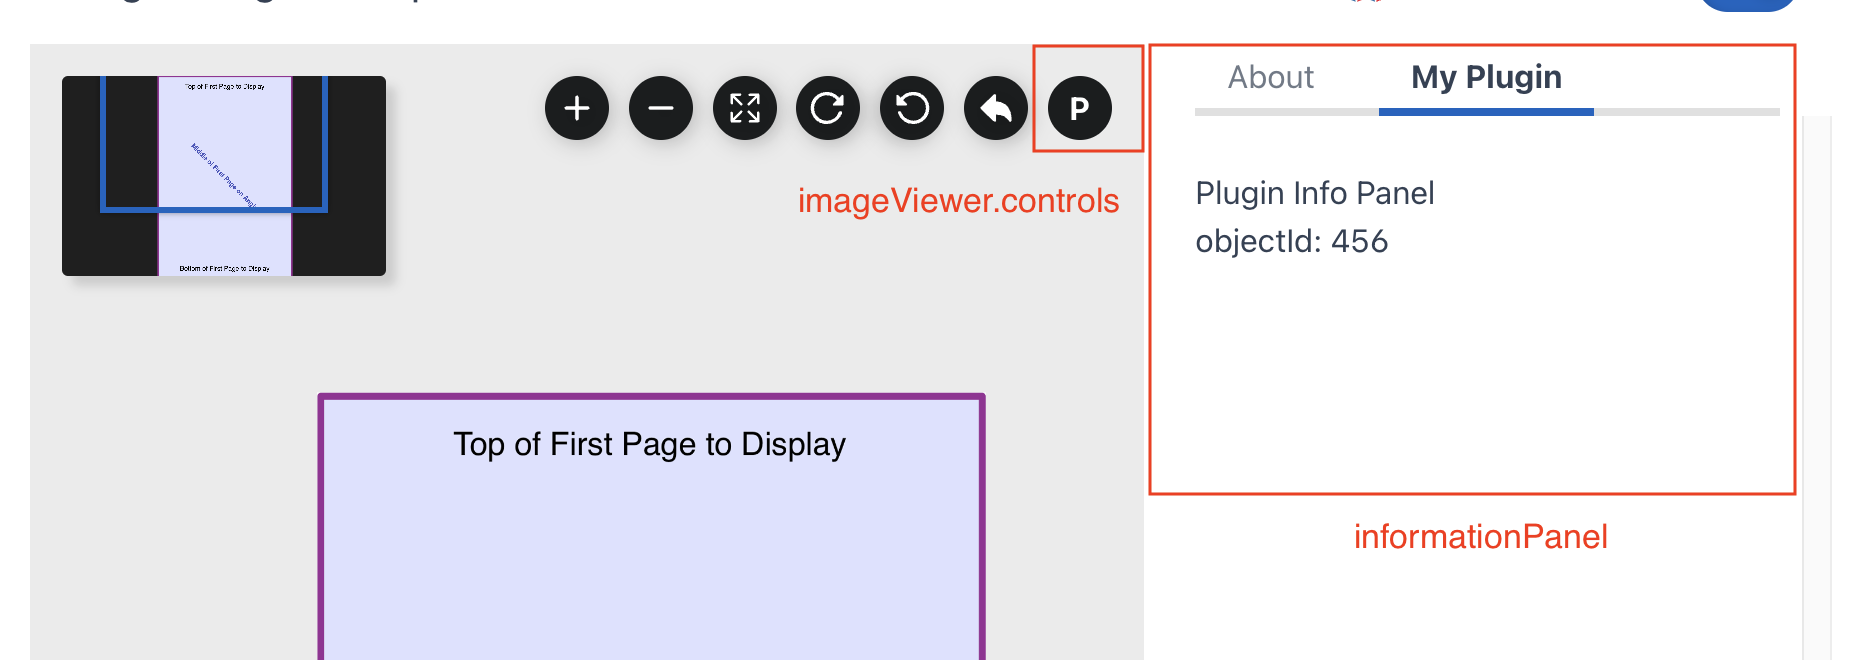
Here's an example of using two plugins. PluginA adds a button to imageViewer.controls. PluginB adds a tab to informationPanel.
import PluginA from "plugin-A";
import PluginB from "plugin-B";

export default function App() {
  return (
    <Viewer
      iiifContent={iiifContent}
      plugins={[
        {
          id: "Plugin A",
          imageViewer: {
            controls: {
              component: PluginA,
            },
          },
        },
        {
          id: "Plugin B",
          informationPanel: {
            component: PluginB,
            componentProps: {
              objectId: 456,
            },
            label: { none: ["My Plugin"] },
          },
        },
      ]}
    />
  );
}
| Prop | Type | Required | Default |
|---|---|---|---|
id | string | yes | |
imageViewer.controls | object | No | |
imageViewer.controls.component | React Component | yes | |
imageViewer.controls.componentProps | object | no | |
informationPanel | object | No | |
informationPanel.component | React Component | yes | |
informationPanel.componentProps | object | no | |
informationPanel.label | object | yes |
id - unique id for the plugin
imageViewer.controls - If you want to add a custom component to image viewer controls, use imageViewer.controls.
imageViewer.controls.component - The component to render.
imageViewer.controls.componentProps - Props passed to the controls component.
informationPanel - If you want to add a custom component to the information panel, use informationPanel.
informationPanel.component - The component to render.
informationPanel.componentProps - Props passed to the information panel component.
informationPanel.label - The text that is displayed in the tab.
Instructions for creating a plugin
Clover offers these features to support plugins:
- Renders custom React components in certain areas of the Clover Viewer. Areas include image viewer controls and information panel.
- Gives plugins the ability to access and change the state of the Clover Viewer via props
- Pass in props to the plugin components
| Prop | Description |
|---|---|
canvas | active canvas object |
useViewerDispatch | React hook to update the Viewer context store (opens in a new tab) |
useViewerState | React hook to access the Viewer context store (opens in a new tab) |
Here is an example plugin that has both imageViewer.controls and informationPanel. Plugin components have access to canvas, useViewerDispatch, and useViewerState via props.
// PluginButton.tsx

export default function PluginButton(props) {
  const { canvas, useViewerDispatch, useViewerState } = props;

  // use useViewerState to access to viewer state properties such as openSeadragonViewer, etc
  const viewerState = useViewerState();
  const { openSeadragonViewer, activeManifest } = viewerState;

  // use useViewerDispatch to update viewer state
  const dispatch = useViewerDispatch();

  function clickHandler() {
    dispatch({
      type: "updateOSDImageLoaded",
      OSDImageLoaded: false,
    });
  }

  return (
    <button
      onClick={clickHandler}
      style={{
        backgroundColor: "var(--colors-primary)",
        borderRadius: "2rem",
        width: "2rem",
        margin: "0px 0px 0px 0.618rem",
      }}
    >
      <b>P</b>
    </button>
  );
}

// PluginInfoPanel.tsx

export default function PluginInfoPanel(props) {
  const {
    canvas,
    useViewerDispatch,
    useViewerState,

    // componentProps
    objectId,
  } = props;

  return (
    <div style={{ padding: "0px 1.618rem 2rem" }}>
      <p>Plugin Info Panel</p>
      <p>objectId: {objectId}</p>
    </div>
  );
}

// App.tsx

import PluginButton from "PluginButton";
import PluginInfoPanel from "PluginInfoPanel";

export default function App() {
  return (
    <Viewer
      iiifContent="https://iiif.io/api/cookbook/recipe/0001-mvm-image/manifest.json"
      plugins={[
        {
          id: "Demo",
          imageViewer: {
            controls: {
              component: PluginButton,
            },
          },
          informationPanel: {
            component: PluginInfoPanel,
            label: { none: ["My Plugin"] },
            componentProps: {
              objectId: 456,
            },
          },
        },
      ]}
    />
  );
}
If the imageViewer.controls.component and informationPanel.component need to share state, wrap the Viewer in a context provider that is provided by the plugin.
import PluginButton from "PluginButton";
import PluginInfoPanel from "PluginInfoPanel";
import { PluginProvider } from "PluginContext";

export default function App() {
  return (
    <PluginProvider>
      <Viewer
        iiifContent="https://iiif.io/api/cookbook/recipe/0001-mvm-image/manifest.json"
        plugins={[
          {
            id: "Demo",
            imageViewer: {
              controls: {
                component: PluginButton,
              },
            },
            informationPanel: {
              component: PluginInfoPanel,
              label: { none: ["My Plugin"] },
              componentProps: {
                objectId: 456,
              },
            },
          },
        ]}
      />
    </PluginProvider>
  );
}